

Cloud to Self-Hosted: Switching from Google Photos to Immich

Introduction
Why switch from Google Photos to a self-hosted solution?
Google Photos has long been a convenient solution for storing and managing personal photos and videos. Its seamless integration with the broader Google ecosystem made it difficult for many users to consider alternatives. However, the transition from offering unlimited free storage to adopting a subscription-based model under Google One prompted many - including myself - to reconsider our reliance on traditional cloud storage. With an increasing number of services moving to subscription models, I find this trend inconvenient and unsustainable for long-term use.
Previously, Google Photos offered free unlimited storage for certain formats, but this policy changed with the announcement in November 2020 that unlimited storage would end on June 1, 2021. Since then, concerns have grown over long-term costs, data privacy, and the lack of control over personal media stored on big tech platforms.
While using the Google One plan - 200GB for £2.49/month - is pretty cheap, my decision to leave the service was not driven by cost. It was about regaining control over my data. I no longer believe entrusting my personal photo collection to a large corporation. In my view, our personal media should not be managed by tech giants whose priorities may not always align with user privacy.
So I decided to cancel the Google One subscription and switch to a self-hosted solution. This way, I have full control over my photos and videos, and I can manage the security and privacy myself.
What is Immich and why I chose it over LibrePhotos or PhotoPrism?
Immich is an open source self-hosted photo and video management solution. It lets users easily back up, organize, and manage their photos on their own server. Immich helps users browse, search and organize their photos and videos with ease, without sacrificing their privacy. Explore the live demo [Open Demo].
One of the main reasons I chose Immich was its modern user interface, which the developer intentionally designed to be similar to Google Photos, making it easy for users to get accustomed to. Unlike older alternatives like LibrePhotos or PhotoPrism, Immich focuses on delivering a polished UI, mobile-first syncing, and smooth timeline organization. After testing all three photo management solutions, I found Immich faster and more polished. The mobile app and commitment to active development made it the clear choice for my home lab.
Overview of the switching process
The rest of the article covers the process I followed from planning to completion: preparing my self-hosted environment and setting up Immich. I configured secure local access using Nginx Proxy Manager with SSL for HTTPS, and I plan to enable remote access with secure VPN connection or Tailscale. I also compare the cost, scalability, and privacy of both platforms and share key lessons I learned along the way.
Planning the Switch
Requirements for Hosting Immich
Hosting Immich is quite straightforward - all you need is a server, which is essentially a computer that's always on and provides services, data, and resources to other devices over a network. This server can even be an old laptop you no longer use. For example, if you have a Windows laptop that became slow over time and you replaced it with a new one, you can repurpose the old laptop as a server by installing Ubuntu to improve its performance.
To store your photos and videos, make sure you have sufficient storage capacity; in my case, I use 2 TB of storage. Here are the basic requirements for hosting Immich:
RAM: Minimum 4GB, recommended 6GB.
CPU: Minimum 2 cores, recommended 4 cores.
Persistent storage large enough to hold your entire photo and video library.
Docker support
Recommended: A domain name for setting up a reverse proxy with HTTPS.
Optional: Remote access configured via Tailscale or WireGuard for secure external connections.
Choosing the Right Hardware: NAS or Home Server?
I had two hosting options:
NAS (Synology): user-friendly and requires minimal setup, making it ideal for people who want a more hands-off experience. However, it comes with some limitations - if I used Synology, I would be tied to their software ecosystem. While it's possible to install third-party apps, it's not as flexible, and you don't have full control over the system. Switching away from their platform in the future or doing deep customisation can be difficult or even unsupported.
Home Server: offers full control and flexibility. I can choose the operating system (like Ubuntu), configure services exactly the way I want, and switch platforms any time. This approach gives me complete freedom to run applications like Immich with Docker, fine-tune performance, and scale or change things as my needs grow.
Ultimately, I chose a home server because it gives me full control over how I host and manage my media.
Setting Up Immich (Linux)
Installing Immich on Docker
The recommended way to install Immich is using Docker and Docker Compose. [Learn More]
Create a directory
./immich-appto save thedocker-compose.ymland.envfiles.mkdir ./immich-app cd ./immich-appDownload these two files
docker-compose.ymlandexample.envfrom your browser and move them to the directory that you created, in which case ensure that you renameexample.envto.env. (Find latest releases on Immich's GitHub)You can also choose to create the
.envfile and populate it with custom values.# You can find documentation for all the supported env variables at https://immich.app/docs/install/environment-variables # The location where your uploaded files are stored UPLOAD_LOCATION=./library # The location where your database files are stored. Network shares are not supported for the database DB_DATA_LOCATION=./postgres # To set a timezone, uncomment the next line and change Etc/UTC to a TZ identifier from this list: https://en.wikipedia.org/wiki/List_of_tz_database_time_zones#List # TZ=Etc/UTC # The Immich version to use. You can pin this to a specific version like "v1.71.0" IMMICH_VERSION=release # Connection secret for postgres. You should change it to a random password # Please use only the characters `A-Za-z0-9`, without special characters or spaces DB_PASSWORD=postgres # The values below this line do not need to be changed ################################################################################### DB_USERNAME=postgres DB_DATABASE_NAME=immichConsider changing
DB_PASSWORDto a custom value. Postgres is not publicly exposed, so this password is only used for local authentication. To avoid issues with Docker parsing this value, it is best to use only the charactersA-Za-z0-9.pwgenis a handy utility for this.Set your timezone by uncommenting the
TZ=line.
Edit your
docker-compose.ymlfile to bind the Immich web port to localhost only. Locate theportssection for theimmich-serverservice and change the line from- '2283:2283'to- '127.0.0.1:2283:2283'name: immich services: immich-server: container_name: immich_server image: ghcr.io/immich-app/immich-server:${IMMICH_VERSION:-release} # extends: # file: hwaccel.transcoding.yml # service: cpu # set to one of [nvenc, quicksync, rkmpp, vaapi, vaapi-wsl] for accelerated transcoding volumes: # Do not edit the next line. If you want to change the media storage location on your system, edit the value of UPLOAD_LOCATION in the .env file - ${UPLOAD_LOCATION}:/usr/src/app/upload - /etc/localtime:/etc/localtime:ro env_file: - .env ports: - '127.0.0.1:2283:2283' depends_on: - redis - database restart: always healthcheck: disable: false # REST OF FILEThis binds
127.0.0.1:2283:2283in the Docker Compose file, which means the Immich server only listens on the local machine's loopback interface. As a result, it's not accessible directly from other devices on the network. Instead, the Nginx Proxy Manager handles external HTTPS requests to https://photos.local.domain.uk and securely forwards them to Immich on localhost, keeping the server protected behind the reverse proxy while managing SSL and external access.From the directory you created in Step 1 run the following command to start Immich as a background service:
docker compose up -d
Using a Reverse Proxy (Nginx Proxy Manager) with SSL for Local HTTPS
Create a directory
./nginx-proxy-managerand inside it, create adocker-compose.ymlfile with the following configuration. [Learn More]services: app: image: 'jc21/nginx-proxy-manager:latest' restart: unless-stopped network_mode: "host" ports: - '80:80' - '81:81' - '443:443' volumes: - ./data:/data - ./letsencrypt:/etc/letsencryptRun the following command to start Nginx Proxy Manager as a background service:
docker compose up -dWhen your docker container is running, navigate to
http://<your-machine-ip>:81for the admin interface.Default Admin User:
Email:    admin@example.com
Password: changeme
Immediately after logging in with this default user you will be asked to change your details and credentials.
Click on Hosts, then select Proxy Hosts, and click the New Proxy Host button. Enter your domain names - you can add multiple if needed. I chose a
.localdomain because it's only accessible within my local network; for example, I used https://photos.local.arnav.uk. Next, set the Forward Hostname/IP to127.0.0.1and the Forward Port to2283.
Click on the SSL tab, then enable Force SSL and Use a DNS Challenge. For the DNS provider, choose Cloudflare, and finally, click to agree to the Let's Encrypt Terms of Service.

In a New Tab go to Cloudflare and Search for API Tokens in the Cloudflare search bar or go directly to dash.cloudflare.com/profile/api-tokens, then click on Create Token.

Then click on Use Template for Edit zone DNS.

Then select your domain name from the dropdown.

Click Create Token

Copy your API token and save it securely in a safe place for future use.

Replace the existing API Token with the one you copied from Cloudflare then click Save.

You should now see Online Status in the Proxy Hosts list.

Go to DNS Records and click Create New Record. Choose
A Record, set the Name to*.local(to cover all subdomains), and enter your machine's IPv4 address as the value. Make sure to set it as DNS only (disable the proxy). To find your machine's IP address, you can runipconfigon Windows orip aon Linux/macOS in the terminal. Then click Save.
You can now access Immich using the domain name you set up - in my case it's https://photos.local.arnav.uk - from any device within your local network, but it won't be accessible from outside your network.
Configuring Users, Partner Sharing, and Mobile App
If you have friends or family members who want to use the application as well, you can create additional accounts for them. [Learn More]
Immich allows you to share your library with other users. They can then view your library and download the assets. You can manage Partner Sharing from the User Settings page on the web. [Learn More]
The mobile app can be downloaded from the following platforms: Google Play Store / Apple App Store / GitHub Releases (APK). [Learn More]
Login to the mobile app using your server's endpoint URL at
https://photos.local.domain.uk(replace this with your own domain name).Navigate to the backup screen and select which album(s) you want to back up to the Immich server.
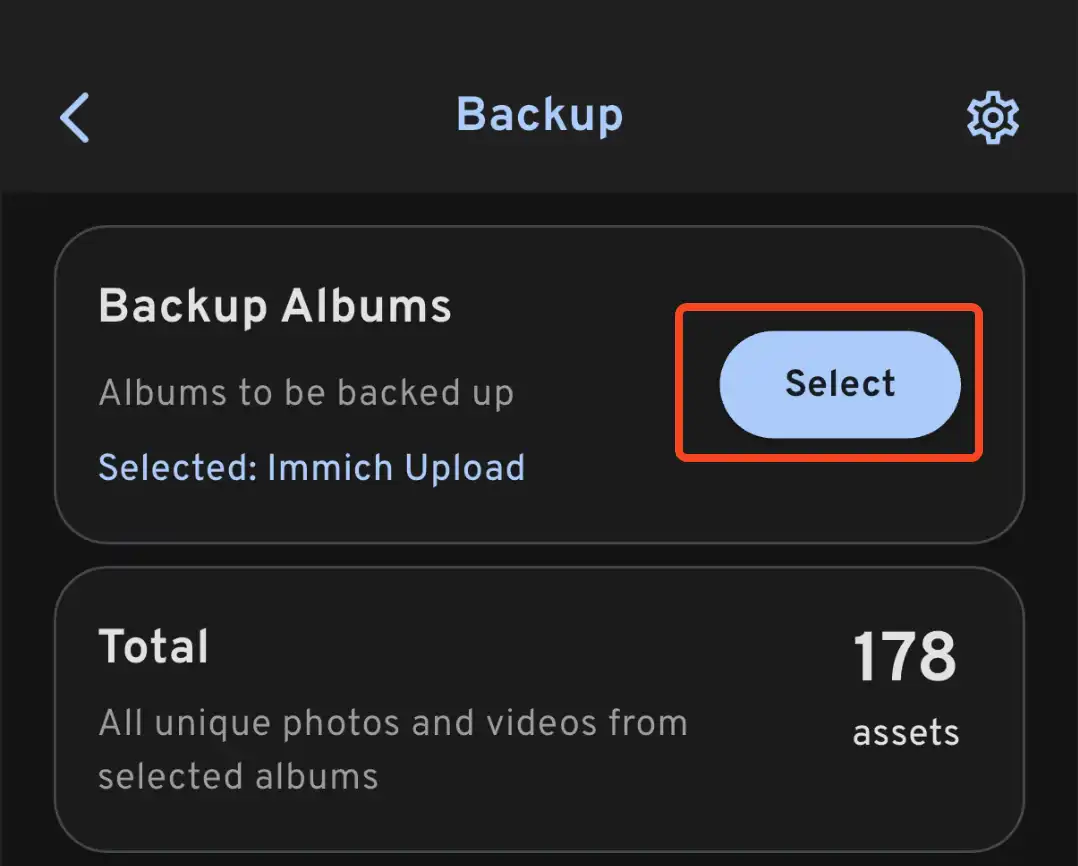
Scroll down to the bottom and press "Start Backup" to start the backup process. This will upload all the assets in the selected albums.
Optional: Setting Up Immich with Tailscale or WireGuard to Access Immich Remotely
[Implementation Pending]
Cost, Privacy, and Scalability
Trade-Offs Between Self-Hosting and Google One Subscription
| Category | Self-Hosting (Home Server / NAS) | Google One |
|---|---|---|
| Initial Setup Cost | Depends on existing hardware (NAS or Home Server required) | £0 |
| Monthly Storage Cost | £0 (uses local disks) | £7.99 |
| Annual Cost (Est.) | Effectively £0 (only minor electricity cost) | £95.88/year |
| Current Storage Capacity | 2TB (current setup) | 2TB |
| Upgrade Path | Add/replace drives (e.g. add another HDD or SSD) | Upgrade to 5TB plan at £19.99/month |
| Backup | ✅ Optional – external SSD/HDD backup | ✅ Included |
| Data Ownership | ✅ Full control, private and secure | ❌ Google manages and accesses metadata |
| Access from Anywhere | ✅ Possible via VPN or Tailscale | ✅ Available by default |
| Maintenance | ⚠️ Requires manual updates and system upkeep | ✅ No maintenance required |
| Customization | ✅ Highly customizable (features, interface, add-ons) | ❌ Limited to Google's options |
| Privacy | ✅ 100% local – no third-party access | ❌ Data resides in Google's Cloud |
Google One Subscription Plans: https://one.google.com/about/plans
Review and Conclusion
Understanding Ports, Networking, and Remote Access

Why Self-Hosting Is Worth It for Photos
Despite a few initial challenges, the result is a fully self-hosted, fast, and modern photo management solution. Immich performs as well as - or even better than - Google Photos in many ways. Now that I've successfully set up a self-hosted photo management service, I am ready to explore hosting more services in the future, particularly Nextcloud for file syncing and collaboration and automatic SSD backups for cold storage. Knowing that all my media is fully owned and controlled by me makes the effort completely worthwhile.
Acknowledgement
Some of the content and instructions in this article have been adapted from the official Immich and Nginx Proxy Manager documentation to provide an easy-to-follow explanation and streamline the setup process. Full credit goes to the development teams of both projects for their thorough and helpful resources.
Immich – for providing an open-source self-hosted photo and video management solution. https://immich.app/
Nginx Proxy Manager - for reverse proxy with SSL for HTTPS. https://nginxproxymanager.com/
Docker and Docker Compose - for containerizing and managing the application setup. https://www.docker.com/


